I finally got the chance to post this. It took awhile for me to upload the pictures because I have to wait for a computer to be available to be use.
This was my first time to do a theme party for my girls. I did a "FROZEN"theme. It was a lot of work but it was all worth it. Martin was so wonderful to allow me to do such thing. He paid for all the supplies and went around town with me to get them.
Martin did the invitations on the computer and printed out. I stamped snowflakes on them. Added a jewel to the middle of each big snowflakes to add bling to the card.
I made the "FROZEN" word in a blue glitter paper. I love the blue glitter paper. So pretty! Looks better in real person.
This was sweets buffet table. I didn't have the sufficent time to decorate so I was a little disappointed. I did my best to decorate anyway. It turned out nice though. Just not how envision it. I'm so thankful a friend came and helped me decorate. I couldn't have done it without her.
A "HAPPY BIRTHDAY FAITH AND HOPE" sign above the sweets buffet table. The banner was done on glitter paper using the pandent die with snowflakes from the Festive Fluries die.
The birthday girls made this garland to go in the front of the sweets buffet table.
I made all these sweets for the very first time except for the candies. I know. Crazy, eh? I searched the web to find recipes and videos on YouTube on how to make them. I learned quite a lot. Now I'm a pro at making sweets. Just kidding. There are still a lotto learn.
First time I learned to frost a cupcake like this. Made it swirly and pretty. It was actually quite easy to do. I normally just use a knife and slather frosting on top of the cupcakes. Very unattractive.
The meringue was a challenge to make but after a few tries it turned out perfect. Look pretty only for the party. Not going to turn out next time. I know it.
My sister helped me make these cake pops. She's so wonderful! Thanks Lisa!
These were chocolate sugar cookie snowflakes. It was tidious work putting the chocolates on the cookies. Don't know how to make them look nice. Sigh!
Table setting for all th young guests.
I crocheted the snowflakes for each of the drink bottles.
Got this snowflake tin from Costco and it was perfect for my centre piece. It came with the chocolates too! Yum!
Some die cut glittery snowflakes. They sat on top of tissue paper snowflakes.
One of our activities. Build a snowman out of marshmallows. "Do you want to build a snowman?"
Blue punch drink.
I made tutu loot bags out of felt, tulle and lace. I also crocheted snowflakes and added it to the front of the bag.
Here is a picture of the fleece scarves on my girls. I forgot to take a picture of the scarf with the bag together. The scarf goes with the loot bag. I crocheted a matching snowflakes for the scarve. Same pattern but thicker yarn. I sewed the dresses for the girls too. They really love it.
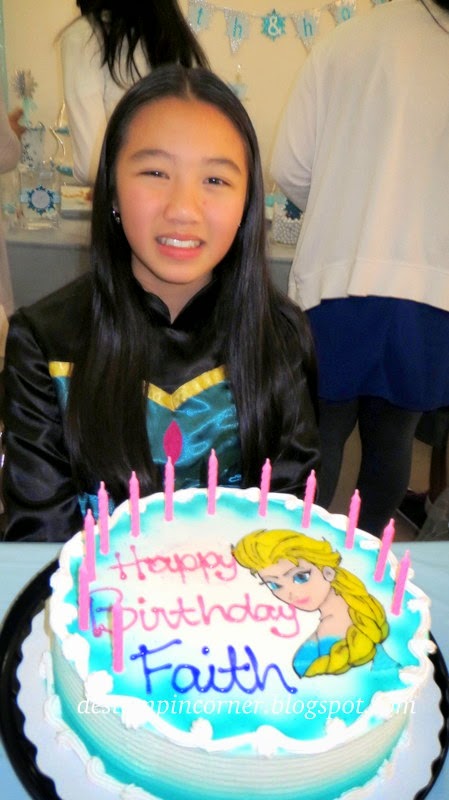
I don't know how to make a cake so I ordered 2 cakes from Dairy Queen. Frozen ice cream cake. Perfect for the theme party.
Thank you for stopping by and for reading this long post. Hope you enjoy reading as much as I enjoy sharing the picture with you. Have a greattach day! Happy Stamping!
Deanna